> ## Documentation Index
> Fetch the complete documentation index at: https://helium-promptless-document-entitlement-management-features.mintlify.site/llms.txt
> Use this file to discover all available pages before exploring further.
# SDK Quickstart (iOS)
> Integrate Helium into your iOS app
**Using an older SDK version?**
If you're upgrading from SDK v2.x, check our [Migration Guide](/sdk-reference/migration-2-to-3) for breaking changes and upgrade instructions.
## Background
Get set up with the Helium SDK for iOS. Reach out over your Helium slack channel or email [founders@tryhelium.com](mailto:founders@tryhelium.com) for any questions.
## Installation
Helium requires a minimum deployment target of iOS 15 and Xcode 14+. (Latest Xcode is recommended.)
We recommend using Swift Package Manager (SPM), but if your project primarily uses Cocoapods it might make sense to install the Helium Cocoapod instead.
1. In Xcode, navigate to your project's **Package Dependencies:**
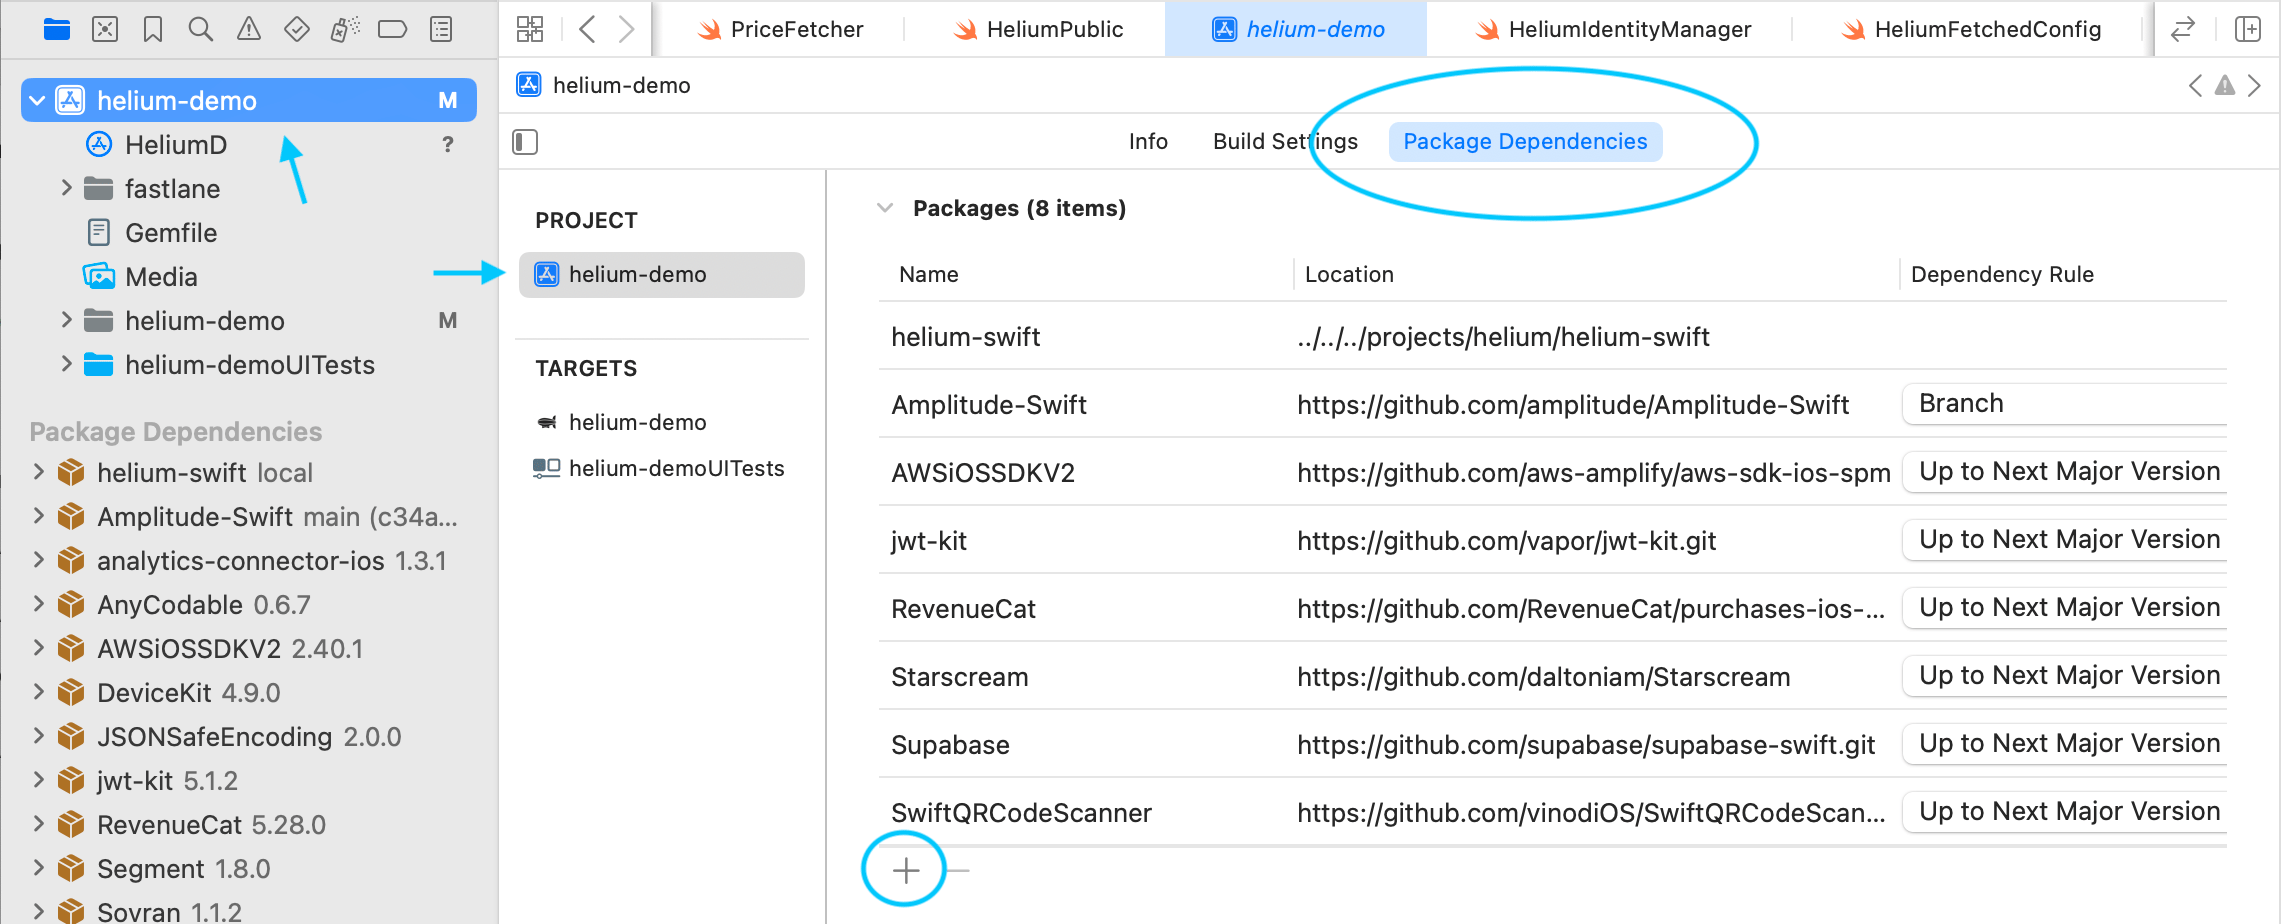 2. Click the **+** button and search for the Helium package URL:
```
https://github.com/cloudcaptainai/helium-swift.git
```
3. Click **Add Package**.
4. In the dialog that appears, make sure to add the **Helium** product to your app's main target:
2. Click the **+** button and search for the Helium package URL:
```
https://github.com/cloudcaptainai/helium-swift.git
```
3. Click **Add Package**.
4. In the dialog that appears, make sure to add the **Helium** product to your app's main target:
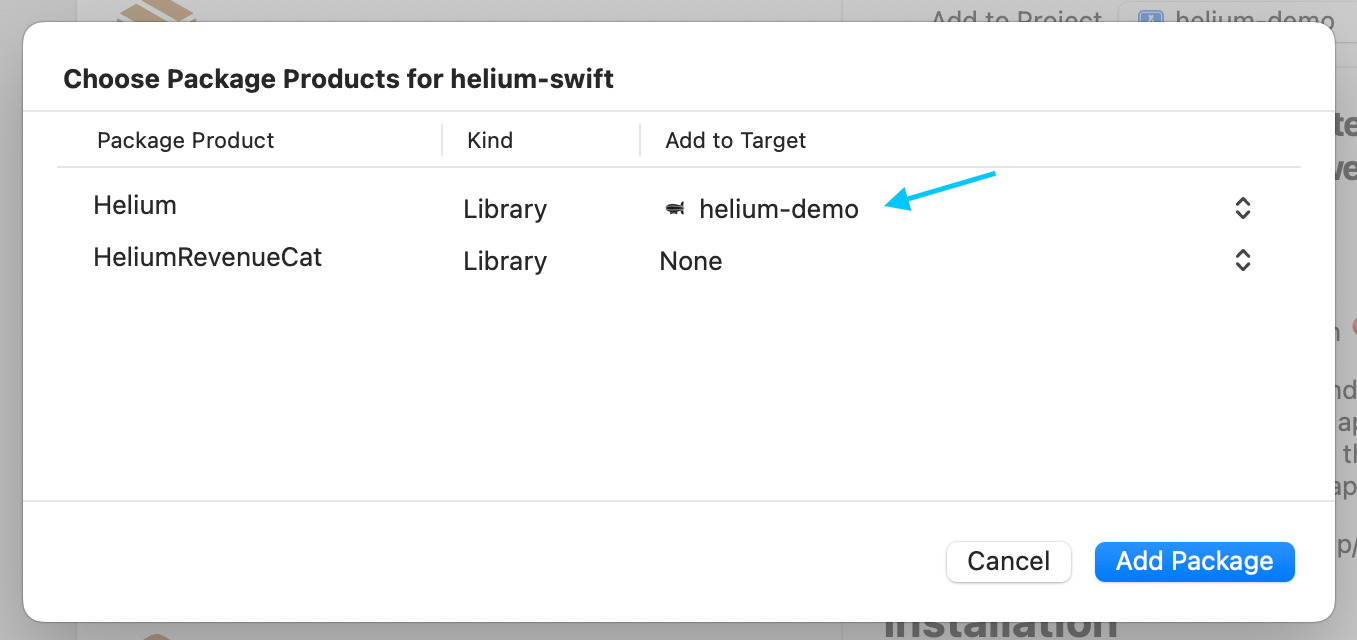 5. *(Optional)* If you are using RevenueCat to manage purchases, we recommended you also add **HeliumRevenueCat** to your target so that you can use our RevenueCatDelegate referenced in the HeliumPaywallDelegate section of this guide. Otherwise leave as **None** for the HeliumRevenueCat row.
The **HeliumRevenueCat** target includes [purchases-ios-spm](https://github.com/RevenueCat/purchases-ios-spm) as a dependency, *not* [purchases-ios](https://github.com/RevenueCat/purchases-ios) and you may encounter build issues if are using **purchases-ios** with SPM.
6. Select **Add Package** in the dialog and Helium should now be ready for import.
7. Version: We recommend using an upToNextMajor rule to make sure you get non-breaking bug fixes. The latest stable version of helium-swift is **3.0.5** :
5. *(Optional)* If you are using RevenueCat to manage purchases, we recommended you also add **HeliumRevenueCat** to your target so that you can use our RevenueCatDelegate referenced in the HeliumPaywallDelegate section of this guide. Otherwise leave as **None** for the HeliumRevenueCat row.
The **HeliumRevenueCat** target includes [purchases-ios-spm](https://github.com/RevenueCat/purchases-ios-spm) as a dependency, *not* [purchases-ios](https://github.com/RevenueCat/purchases-ios) and you may encounter build issues if are using **purchases-ios** with SPM.
6. Select **Add Package** in the dialog and Helium should now be ready for import.
7. Version: We recommend using an upToNextMajor rule to make sure you get non-breaking bug fixes. The latest stable version of helium-swift is **3.0.5** :
 ### Option 1: Core functionality only
Add this to your Podfile:
```ruby
pod 'Helium', '~> 3.0'
```
Then run:
```bash
pod install
```
### Option 2: Core + RevenueCat
Recommended if you are using RevenueCat to manage purchases.
Add this to your Podfile:
```ruby
pod 'Helium/RevenueCat', '~> 3.0'
```
Then run:
```bash
pod install
```
## Initialize Helium
Initialize the Helium SDK as early as possible in your app's lifecycle. Choose the appropriate location based on your app's architecture:
```swift
@main
struct MyApp: App {
init() {
// Call Helium.shared.initialize here (see example below)
}
var body: some Scene {
WindowGroup {
ContentView()
}
}
}
```
```swift
class SceneDelegate: UIResponder, UIWindowSceneDelegate {
var window: UIWindow?
func scene(_ scene: UIScene, willConnectTo session: UISceneSession, options connectionOptions: UIScene.ConnectionOptions) {
// Call Helium.shared.initialize here (see example below)
}
}
```
```swift
@UIApplicationMain
class AppDelegate: UIResponder, UIApplicationDelegate {
var window: UIWindow?
func application(_ application: UIApplication, didFinishLaunchingWithOptions launchOptions: [UIApplication.LaunchOptionsKey: Any]?) -> Bool {
// Call Helium.shared.initialize here (see example below)
return true
}
}
```
Add necessary imports:
```swift
import Helium
```
And initialize Helium in the location referenced above:
```swift
// Create fallback configuration
// with a fallback bundle (recommended)
let fallbackBundleURL = Bundle.main.url(forResource: "fallback-bundle", withExtension: "json")
let fallbackConfig = HeliumFallbackConfig.withFallbackBundle(fallbackBundleURL)
// or by providing a SwiftUI View
let fallbackConfig = HeliumFallbackConfig.withFallbackView(
Text("Fallback shown")
)
Helium.shared.initialize(
apiKey: "",
fallbackConfig: fallbackConfig,
revenueCatAppUserId: Purchases.shared.appUserID // RevenueCat ONLY
)
```
You can create or retrieve your api key from [Account Settings](https://app.tryhelium.com/profile).
Delegate to handle paywall events and callbacks (see next section)
Fallback configuration with either a view or bundle URL. Required parameter.
*(Optional)* If set, a custom user id to use instead of Helium's. We'll use this id when forwarding to third party analytics services, so this can be used for attribution (e.g. an amplitude user id, or a custom user id from your own analytics service)
*(Optional)* Pass in custom user traits to be used for targeting, personalization, and dynamic content. It can be created with any dictionary, as long as the key is a string and the value is a `Codable` type.
```swift
let customUserTraits = HeliumUserTraits(traits: [
"testTrait": 1,
"account_age_in_days": "20",
])
```
*(Optional)* Set this if you use a custom appAccountToken with your StoreKit purchases.
*(Optional)* RevenueCat ONLY. Supply RevenueCat appUserID here (and initialize RevenueCat before Helium initialize).
You can also set this value outside of initialize: `Helium.shared.setRevenueCatAppUserId(Purchases.shared.appUserID)`
No need to set this if you use RevenueCatDelegate (see next section).
Helium's initialization is ran on a background thread, so you don't have to worry about it blocking your app's launch time. Helium will automatically retry downloads as needed for up to 90 seconds.
You can provide a custom user ID and custom user traits in the `initialize` method or by using `Helium.shared.overrideUserId`. Ideally this will be called before `initialize` is called to ensure consistency in analytics events.
```swift
Helium.shared.overrideUserId(
newUserId: "",
traits: HeliumUserTraits? = nil
);
```
You can check the status of the paywall configuration download using the `Helium.shared.getDownloadStatus()` method. This method returns a value of type `HeliumFetchedConfigStatus`, which is defined as follows:
```swift
public enum HeliumFetchedConfigStatus: String, Codable, Equatable {
case notDownloadedYet
case inProgress
case downloadSuccess
case downloadFailure
}
```
You can also simply check if paywalls have been successfully downloaded with `Helium.shared.paywallsLoaded()`.
Retrieve basic information about the paywall ready to show for a specific trigger
with `Helium.shared.getPaywallInfo(trigger: String)` which returns:
```swift
public struct PaywallInfo {
public let paywallTemplateName: String
public let shouldShow: Bool
}
```
## HeliumPaywallDelegate
The `HeliumPaywallDelegate` can be passed in to `Helium.shared.initialize` otherwise the default `StoreKitDelegate` will be used. This delegate is responsible for handling the purchase logic for your paywalls and handling [Helium Events](/sdk/helium-events).
Use one of our pre-built delegates or create a custom subclass of `HeliumPaywallDelegate`.
Use the StoreKitDelegate to handle purchases using native StoreKit 2:
```swift
import Helium
let delegate = StoreKitDelegate()
```
To handle [Helium Events](/sdk/helium-events), simply create a subclass of StoreKitDelegate and override `onPaywallEvent`:
```swift
class MyStoreKitDelegate: StoreKitDelegate {
override func onPaywallEvent(_ event: HeliumEvent) {
switch event {
case let openEvent as PaywallOpenEvent:
// handle open event here
break
case let closeEvent as PaywallCloseEvent:
break
case let dismissEvent as PaywallDismissedEvent:
break
case let purchaseEvent as PurchaseSucceededEvent:
break
default:
break
}
}
}
```
If you subclass `StoreKitDelegate`, make sure to pass in to `Helium.shared.initialize`!
Make sure you included HeliumRevenueCat (for SPM) or Helium/RevenueCat (for Cocoapod) as noted in the Installation section.
You can use the pre-built RevenueCatDelegate to handle purchases if your app is using RevenueCat:
```swift
import HeliumRevenueCat // unless using Cocoapod then can just import Helium
let delegate = RevenueCatDelegate(
entitlementId: "",
revenueCatApiKey: "" // Optional - pass in to have Helium to handle RevenueCat initialization.
)
```
If you do not supply `revenueCatApiKey`, make sure to initialize RevenueCat *before* initializing Helium!
To handle [Helium Events](/sdk/helium-events), simply create a subclass of RevenueCatDelegate and override `onPaywallEvent`:
```swift
class MyRevenueCatDelegate: RevenueCatDelegate {
override func onPaywallEvent(_ event: HeliumEvent) {
switch event {
case let openEvent as PaywallOpenEvent:
// handle open event here
break
case let closeEvent as PaywallCloseEvent:
break
case let dismissEvent as PaywallDismissedEvent:
break
case let purchaseEvent as PurchaseSucceededEvent:
break
default:
break
}
}
}
```
Make sure to pass your delegate in to `Helium.shared.initialize`!
You can also create a custom delegate and implement your own purchase logic. You can look at our `StoreKitDelegate` and `RevenueCatDelegate` in the SDK for examples (also linked below).
The `HeliumPaywallDelegate` is defined as follows:
```swift
public protocol HeliumPaywallDelegate: AnyObject {
// Execute the purchase of a product given the product ID.
func makePurchase(productId: String) async -> HeliumPaywallTransactionStatus
// (Optional) - Restore any existing subscriptions.
// Return a boolean indicating whether the restore was successful.
func restorePurchases() async -> Bool
// (Optional) - Handle Helium Events
func onPaywallEvent(_ event: HeliumEvent)
}
```
`HeliumPaywallTransactionStatus` is an enum that defines the possible states of a paywall transaction:
```swift
public enum HeliumPaywallTransactionStatus {
case purchased
case cancelled
case failed(Error)
case restored
case pending
}
```
Visit [Helium Events](/sdk/helium-events) for details on the different Helium paywall events.
When executing the purchase via StoreKit 2 (recommended over StoreKit 1), please use `Product.heliumPurchase()` instead of `Product.purchase()`. For example:
`let result = try await product.heliumPurchase()`
This will automatically set attribution information for [revenue tracking](/guides/revenue-reporting).
StoreKitDelegate example [here](https://github.com/cloudcaptainai/helium-swift/blob/main/Sources/Helium/HeliumCore/StoreKitDelegate.swift).
RevenueCatDelegate example [here](https://github.com/cloudcaptainai/helium-swift/blob/main/Sources/HeliumRevenueCat/HeliumRevenueCat.swift).
## Presenting Paywalls
You must have a trigger and workflow configured in the dashboard in order to show a paywall.
Now, anywhere in your iOS app, you can show a paywall in one of 3 ways.
### Show it as a full screen modal (recommended)
Call `Helium.shared.presentUpsell(trigger:)` when you want to show the paywall. For example:
```swift
Button("Try Premium") {
Helium.shared.presentUpsell(trigger: "post_onboarding")
}
```
You can also prevent the paywall from showing if the user already has entitlements for products in that paywall:
```swift
Button("Try Premium") {
Helium.shared.presentUpsell(
trigger: "post_onboarding",
dontShowIfAlreadyEntitled: true
)
}
```
The trigger name configured in your Helium dashboard
*(Optional)* The view controller to present from. If nil, uses the current top view controller
*(Optional)* Event handlers for paywall lifecycle events
*(Optional)* Custom traits to pass to the paywall for personalization
*(Optional)* If `true`, the paywall will not show if the user already has entitlements for any products in the paywall. Use this to avoid showing upgrade prompts to users who already have premium access.
### Attach it to a SwiftUI view as a ViewModifier
You can use the `.triggerUpsell` view modifier from any SwiftUI view:
```swift
struct ContentView: View {
@State var isPresented: Bool = false
var body: some View {
VStack {
Button {
isPresented = true;
} label: {
Text("Show paywall")
}
}.triggerUpsell(isPresented: $isPresented, trigger: "post_onboarding")
}
}
```
### Explicitly embed the Helium Paywall View
You can also explicitly get the Helium paywall view via `Helium.shared.upsellViewForTrigger`. This method takes a trigger and returns the paywall as an `AnyView`.
```swift
let heliumView: AnyView? = Helium.shared.upsellViewForTrigger(
trigger: "post_onboarding"
)
```
You'll need to handle presentation and dismissal yourself if you use this way of displaying paywalls. You can handle dismissal with PaywallEventHandlers.
### PaywallEventHandlers
When displaying a paywall you can pass in event handlers to listen for relevant [Helium Events](/sdk/helium-events). You can chain a subset of handlers with builder syntax:
```swift presentUpsell
Helium.shared.presentUpsell(
trigger: "post_onboarding",
eventHandlers: PaywallEventHandlers()
.onOpen { event in
print("\(event.paywallName) via trigger \(event.triggerName)")
}
.onClose { event in
print("\(event.paywallName) for trigger \(event.triggerName)")
}
.onDismissed { event in
print("\(event.paywallName) for trigger \(event.triggerName)")
}
.onPurchaseSucceeded { event in
print("\(event.paywallName) for trigger \(event.triggerName)")
}
)
```
```swift triggerUpsell
struct ContentView: View {
@State var isPresented: Bool = false
var body: some View {
VStack {
Button {
isPresented = true;
} label: {
Text("Show paywall")
}
}.triggerUpsell(
isPresented: $isPresented,
trigger: "post_onboarding",
eventHandlers: PaywallEventHandlers()
.onOpen { event in
print("\(event.paywallName) via trigger \(event.triggerName)")
}
.onClose { event in
print("\(event.paywallName) for trigger \(event.triggerName)")
}
.onDismissed { event in
print("\(event.paywallName) for trigger \(event.triggerName)")
}
.onPurchaseSucceeded { event in
print("\(event.paywallName) for trigger \(event.triggerName)")
}
)
}
}
```
```swift upsellViewForTrigger
Helium.shared.upsellViewForTrigger(
trigger: "post_onboarding",
eventHandlers: PaywallEventHandlers()
.onOpen { event in
print("\(event.paywallName) via trigger \(event.triggerName)")
}
.onClose { event in
print("\(event.paywallName) for trigger \(event.triggerName)")
}
.onDismissed { event in
// handle user dismissal here (i.e. hide the upsell view)
print("\(event.paywallName) for trigger \(event.triggerName)")
}
.onPurchaseSucceeded { event in
print("\(event.paywallName) for trigger \(event.triggerName)")
}
)
```
Only the `onOpen`, `onClose`, `onDismiss`, and \`onPurchaseSucceeded events can be specified this way. For others, see the section on **HeliumPaywallDelegate**.
**Event Timing:**
* `onDismiss` is triggered only when a user manually dismisses a paywall (from an X button, "no thanks", etc.)
* `onClose` is triggered both when the paywall is manually dismissed OR when a successful purchase triggers closing the paywall. (So any time the paywall is removed.)
* `onPurchaseSucceeded` is triggered when a purchase completes successfully
**Usage Guidelines:**
* Use `onDismiss` for post-paywall navigation when the paywall is dismissed but a user's entitlement hasn't changed
* Use `onPurchaseSucceeded` for your post purchase flow (e.g., a premium onboarding navigation)
* Use `onClose` when you need to handle logic when the paywall closed, regardless of reason
## Checking Subscription Status & Entitlements
The Helium SDK provides methods to check user entitlements and subscription status. All entitlement checking methods are `async` and should be called from within an async context.
The SDK automatically caches entitlement data and listens for transaction updates to keep information current.
### Available Methods
**`hasAnyEntitlement()`**\
Determines if the user has purchased any non-consumable products or subscriptions.
**`hasAnyActiveSubscription(includeNonRenewing: Bool = true)`**\
Checks if the user has any active subscriptions. Set `includeNonRenewing` to `false` to check only auto-renewing subscriptions.
**`hasEntitlementForPaywall(trigger: String, considerAssociatedSubscriptions: Bool = false)`**\
Checks if the user already has entitlements for products shown in a specific paywall trigger. Returns `nil` if paywall configuration hasn't been downloaded yet.
**`hasActiveEntitlementFor(productId: String)`**\
Checks if the user has entitlement to a specific product.
**`hasActiveSubscriptionFor(productId: String)`**\
Checks if the user has an active subscription for a specific product.
**`hasActiveSubscriptionFor(subscriptionGroupID: String)`**\
Checks if the user has an active subscription in a specific subscription group.
**`purchasedProductIds()`**\
Retrieves a list of all product IDs the user currently has access to.
**`activeSubscriptions()`**\
Returns detailed information about all active auto-renewing subscriptions.
**`subscriptionStatusFor(productId: String)`**\
Gets detailed subscription status for a specific product, including state information like subscribed, expired, or in grace period.
**`subscriptionStatusFor(subscriptionGroupID: String)`**\
Gets detailed subscription status for a specific subscription group.
Check entitlements before showing paywalls to avoid presenting upgrade prompts to users who already have premium access.
## Fallbacks and Loading Budgets
If a paywall has not completed downloading when you attempt to present it, a loading state can show.
By default, Helium will show this loading state as needed (a shimmer view for up to 2 seconds). You can configure, turn off, or set trigger-specific loading budgets.
If the budget expires before the paywall is ready, a fallback paywall will show if available otherwise the loading state will hide and a [PaywallOpenFailed](/sdk/helium-events) event will be dispatched.
The iOS sdk has 3 options for fallbacks:
1. [Fallback bundles](/guides/fallback-bundle)
2. Default fallback view
3. Fallback view per trigger
All of this is configured via the `HeliumFallbackConfig` object passed in to `initialize`. Here are some examples:
```swift
// Just provde a fallback bundle
let fallbackBundleURL = Bundle.main.url(
forResource: "fallback-bundle-xxxx-xx-xx",
withExtension: "json"
)
let fallbackConfig = HeliumFallbackConfig.withFallbackBundle(fallbackBundleURL)
// Provide fallback view and configure loading budgets
let fallbackConfig = HeliumFallbackConfig(
fallbackView: YourFallbackView(),
// Global loading budget (in seconds)
loadingBudget: 2.0,
// Per-trigger loading budgets
perTriggerLoadingConfig: [
"onboarding": TriggerLoadingConfig(loadingBudget: 4),
"quick_upgrade": TriggerLoadingConfig(useLoadingState: false),
]
)
Helium.shared.initialize(
apiKey: "your-api-key",
fallbackConfig: fallbackConfig
)
```
## Testing
Docs here coming soon! After integration, please message us directly to get set up with a test app + in-app test support.
### Option 1: Core functionality only
Add this to your Podfile:
```ruby
pod 'Helium', '~> 3.0'
```
Then run:
```bash
pod install
```
### Option 2: Core + RevenueCat
Recommended if you are using RevenueCat to manage purchases.
Add this to your Podfile:
```ruby
pod 'Helium/RevenueCat', '~> 3.0'
```
Then run:
```bash
pod install
```
## Initialize Helium
Initialize the Helium SDK as early as possible in your app's lifecycle. Choose the appropriate location based on your app's architecture:
```swift
@main
struct MyApp: App {
init() {
// Call Helium.shared.initialize here (see example below)
}
var body: some Scene {
WindowGroup {
ContentView()
}
}
}
```
```swift
class SceneDelegate: UIResponder, UIWindowSceneDelegate {
var window: UIWindow?
func scene(_ scene: UIScene, willConnectTo session: UISceneSession, options connectionOptions: UIScene.ConnectionOptions) {
// Call Helium.shared.initialize here (see example below)
}
}
```
```swift
@UIApplicationMain
class AppDelegate: UIResponder, UIApplicationDelegate {
var window: UIWindow?
func application(_ application: UIApplication, didFinishLaunchingWithOptions launchOptions: [UIApplication.LaunchOptionsKey: Any]?) -> Bool {
// Call Helium.shared.initialize here (see example below)
return true
}
}
```
Add necessary imports:
```swift
import Helium
```
And initialize Helium in the location referenced above:
```swift
// Create fallback configuration
// with a fallback bundle (recommended)
let fallbackBundleURL = Bundle.main.url(forResource: "fallback-bundle", withExtension: "json")
let fallbackConfig = HeliumFallbackConfig.withFallbackBundle(fallbackBundleURL)
// or by providing a SwiftUI View
let fallbackConfig = HeliumFallbackConfig.withFallbackView(
Text("Fallback shown")
)
Helium.shared.initialize(
apiKey: "",
fallbackConfig: fallbackConfig,
revenueCatAppUserId: Purchases.shared.appUserID // RevenueCat ONLY
)
```
You can create or retrieve your api key from [Account Settings](https://app.tryhelium.com/profile).
Delegate to handle paywall events and callbacks (see next section)
Fallback configuration with either a view or bundle URL. Required parameter.
*(Optional)* If set, a custom user id to use instead of Helium's. We'll use this id when forwarding to third party analytics services, so this can be used for attribution (e.g. an amplitude user id, or a custom user id from your own analytics service)
*(Optional)* Pass in custom user traits to be used for targeting, personalization, and dynamic content. It can be created with any dictionary, as long as the key is a string and the value is a `Codable` type.
```swift
let customUserTraits = HeliumUserTraits(traits: [
"testTrait": 1,
"account_age_in_days": "20",
])
```
*(Optional)* Set this if you use a custom appAccountToken with your StoreKit purchases.
*(Optional)* RevenueCat ONLY. Supply RevenueCat appUserID here (and initialize RevenueCat before Helium initialize).
You can also set this value outside of initialize: `Helium.shared.setRevenueCatAppUserId(Purchases.shared.appUserID)`
No need to set this if you use RevenueCatDelegate (see next section).
Helium's initialization is ran on a background thread, so you don't have to worry about it blocking your app's launch time. Helium will automatically retry downloads as needed for up to 90 seconds.
You can provide a custom user ID and custom user traits in the `initialize` method or by using `Helium.shared.overrideUserId`. Ideally this will be called before `initialize` is called to ensure consistency in analytics events.
```swift
Helium.shared.overrideUserId(
newUserId: "",
traits: HeliumUserTraits? = nil
);
```
You can check the status of the paywall configuration download using the `Helium.shared.getDownloadStatus()` method. This method returns a value of type `HeliumFetchedConfigStatus`, which is defined as follows:
```swift
public enum HeliumFetchedConfigStatus: String, Codable, Equatable {
case notDownloadedYet
case inProgress
case downloadSuccess
case downloadFailure
}
```
You can also simply check if paywalls have been successfully downloaded with `Helium.shared.paywallsLoaded()`.
Retrieve basic information about the paywall ready to show for a specific trigger
with `Helium.shared.getPaywallInfo(trigger: String)` which returns:
```swift
public struct PaywallInfo {
public let paywallTemplateName: String
public let shouldShow: Bool
}
```
## HeliumPaywallDelegate
The `HeliumPaywallDelegate` can be passed in to `Helium.shared.initialize` otherwise the default `StoreKitDelegate` will be used. This delegate is responsible for handling the purchase logic for your paywalls and handling [Helium Events](/sdk/helium-events).
Use one of our pre-built delegates or create a custom subclass of `HeliumPaywallDelegate`.
Use the StoreKitDelegate to handle purchases using native StoreKit 2:
```swift
import Helium
let delegate = StoreKitDelegate()
```
To handle [Helium Events](/sdk/helium-events), simply create a subclass of StoreKitDelegate and override `onPaywallEvent`:
```swift
class MyStoreKitDelegate: StoreKitDelegate {
override func onPaywallEvent(_ event: HeliumEvent) {
switch event {
case let openEvent as PaywallOpenEvent:
// handle open event here
break
case let closeEvent as PaywallCloseEvent:
break
case let dismissEvent as PaywallDismissedEvent:
break
case let purchaseEvent as PurchaseSucceededEvent:
break
default:
break
}
}
}
```
If you subclass `StoreKitDelegate`, make sure to pass in to `Helium.shared.initialize`!
Make sure you included HeliumRevenueCat (for SPM) or Helium/RevenueCat (for Cocoapod) as noted in the Installation section.
You can use the pre-built RevenueCatDelegate to handle purchases if your app is using RevenueCat:
```swift
import HeliumRevenueCat // unless using Cocoapod then can just import Helium
let delegate = RevenueCatDelegate(
entitlementId: "",
revenueCatApiKey: "" // Optional - pass in to have Helium to handle RevenueCat initialization.
)
```
If you do not supply `revenueCatApiKey`, make sure to initialize RevenueCat *before* initializing Helium!
To handle [Helium Events](/sdk/helium-events), simply create a subclass of RevenueCatDelegate and override `onPaywallEvent`:
```swift
class MyRevenueCatDelegate: RevenueCatDelegate {
override func onPaywallEvent(_ event: HeliumEvent) {
switch event {
case let openEvent as PaywallOpenEvent:
// handle open event here
break
case let closeEvent as PaywallCloseEvent:
break
case let dismissEvent as PaywallDismissedEvent:
break
case let purchaseEvent as PurchaseSucceededEvent:
break
default:
break
}
}
}
```
Make sure to pass your delegate in to `Helium.shared.initialize`!
You can also create a custom delegate and implement your own purchase logic. You can look at our `StoreKitDelegate` and `RevenueCatDelegate` in the SDK for examples (also linked below).
The `HeliumPaywallDelegate` is defined as follows:
```swift
public protocol HeliumPaywallDelegate: AnyObject {
// Execute the purchase of a product given the product ID.
func makePurchase(productId: String) async -> HeliumPaywallTransactionStatus
// (Optional) - Restore any existing subscriptions.
// Return a boolean indicating whether the restore was successful.
func restorePurchases() async -> Bool
// (Optional) - Handle Helium Events
func onPaywallEvent(_ event: HeliumEvent)
}
```
`HeliumPaywallTransactionStatus` is an enum that defines the possible states of a paywall transaction:
```swift
public enum HeliumPaywallTransactionStatus {
case purchased
case cancelled
case failed(Error)
case restored
case pending
}
```
Visit [Helium Events](/sdk/helium-events) for details on the different Helium paywall events.
When executing the purchase via StoreKit 2 (recommended over StoreKit 1), please use `Product.heliumPurchase()` instead of `Product.purchase()`. For example:
`let result = try await product.heliumPurchase()`
This will automatically set attribution information for [revenue tracking](/guides/revenue-reporting).
StoreKitDelegate example [here](https://github.com/cloudcaptainai/helium-swift/blob/main/Sources/Helium/HeliumCore/StoreKitDelegate.swift).
RevenueCatDelegate example [here](https://github.com/cloudcaptainai/helium-swift/blob/main/Sources/HeliumRevenueCat/HeliumRevenueCat.swift).
## Presenting Paywalls
You must have a trigger and workflow configured in the dashboard in order to show a paywall.
Now, anywhere in your iOS app, you can show a paywall in one of 3 ways.
### Show it as a full screen modal (recommended)
Call `Helium.shared.presentUpsell(trigger:)` when you want to show the paywall. For example:
```swift
Button("Try Premium") {
Helium.shared.presentUpsell(trigger: "post_onboarding")
}
```
You can also prevent the paywall from showing if the user already has entitlements for products in that paywall:
```swift
Button("Try Premium") {
Helium.shared.presentUpsell(
trigger: "post_onboarding",
dontShowIfAlreadyEntitled: true
)
}
```
The trigger name configured in your Helium dashboard
*(Optional)* The view controller to present from. If nil, uses the current top view controller
*(Optional)* Event handlers for paywall lifecycle events
*(Optional)* Custom traits to pass to the paywall for personalization
*(Optional)* If `true`, the paywall will not show if the user already has entitlements for any products in the paywall. Use this to avoid showing upgrade prompts to users who already have premium access.
### Attach it to a SwiftUI view as a ViewModifier
You can use the `.triggerUpsell` view modifier from any SwiftUI view:
```swift
struct ContentView: View {
@State var isPresented: Bool = false
var body: some View {
VStack {
Button {
isPresented = true;
} label: {
Text("Show paywall")
}
}.triggerUpsell(isPresented: $isPresented, trigger: "post_onboarding")
}
}
```
### Explicitly embed the Helium Paywall View
You can also explicitly get the Helium paywall view via `Helium.shared.upsellViewForTrigger`. This method takes a trigger and returns the paywall as an `AnyView`.
```swift
let heliumView: AnyView? = Helium.shared.upsellViewForTrigger(
trigger: "post_onboarding"
)
```
You'll need to handle presentation and dismissal yourself if you use this way of displaying paywalls. You can handle dismissal with PaywallEventHandlers.
### PaywallEventHandlers
When displaying a paywall you can pass in event handlers to listen for relevant [Helium Events](/sdk/helium-events). You can chain a subset of handlers with builder syntax:
```swift presentUpsell
Helium.shared.presentUpsell(
trigger: "post_onboarding",
eventHandlers: PaywallEventHandlers()
.onOpen { event in
print("\(event.paywallName) via trigger \(event.triggerName)")
}
.onClose { event in
print("\(event.paywallName) for trigger \(event.triggerName)")
}
.onDismissed { event in
print("\(event.paywallName) for trigger \(event.triggerName)")
}
.onPurchaseSucceeded { event in
print("\(event.paywallName) for trigger \(event.triggerName)")
}
)
```
```swift triggerUpsell
struct ContentView: View {
@State var isPresented: Bool = false
var body: some View {
VStack {
Button {
isPresented = true;
} label: {
Text("Show paywall")
}
}.triggerUpsell(
isPresented: $isPresented,
trigger: "post_onboarding",
eventHandlers: PaywallEventHandlers()
.onOpen { event in
print("\(event.paywallName) via trigger \(event.triggerName)")
}
.onClose { event in
print("\(event.paywallName) for trigger \(event.triggerName)")
}
.onDismissed { event in
print("\(event.paywallName) for trigger \(event.triggerName)")
}
.onPurchaseSucceeded { event in
print("\(event.paywallName) for trigger \(event.triggerName)")
}
)
}
}
```
```swift upsellViewForTrigger
Helium.shared.upsellViewForTrigger(
trigger: "post_onboarding",
eventHandlers: PaywallEventHandlers()
.onOpen { event in
print("\(event.paywallName) via trigger \(event.triggerName)")
}
.onClose { event in
print("\(event.paywallName) for trigger \(event.triggerName)")
}
.onDismissed { event in
// handle user dismissal here (i.e. hide the upsell view)
print("\(event.paywallName) for trigger \(event.triggerName)")
}
.onPurchaseSucceeded { event in
print("\(event.paywallName) for trigger \(event.triggerName)")
}
)
```
Only the `onOpen`, `onClose`, `onDismiss`, and \`onPurchaseSucceeded events can be specified this way. For others, see the section on **HeliumPaywallDelegate**.
**Event Timing:**
* `onDismiss` is triggered only when a user manually dismisses a paywall (from an X button, "no thanks", etc.)
* `onClose` is triggered both when the paywall is manually dismissed OR when a successful purchase triggers closing the paywall. (So any time the paywall is removed.)
* `onPurchaseSucceeded` is triggered when a purchase completes successfully
**Usage Guidelines:**
* Use `onDismiss` for post-paywall navigation when the paywall is dismissed but a user's entitlement hasn't changed
* Use `onPurchaseSucceeded` for your post purchase flow (e.g., a premium onboarding navigation)
* Use `onClose` when you need to handle logic when the paywall closed, regardless of reason
## Checking Subscription Status & Entitlements
The Helium SDK provides methods to check user entitlements and subscription status. All entitlement checking methods are `async` and should be called from within an async context.
The SDK automatically caches entitlement data and listens for transaction updates to keep information current.
### Available Methods
**`hasAnyEntitlement()`**\
Determines if the user has purchased any non-consumable products or subscriptions.
**`hasAnyActiveSubscription(includeNonRenewing: Bool = true)`**\
Checks if the user has any active subscriptions. Set `includeNonRenewing` to `false` to check only auto-renewing subscriptions.
**`hasEntitlementForPaywall(trigger: String, considerAssociatedSubscriptions: Bool = false)`**\
Checks if the user already has entitlements for products shown in a specific paywall trigger. Returns `nil` if paywall configuration hasn't been downloaded yet.
**`hasActiveEntitlementFor(productId: String)`**\
Checks if the user has entitlement to a specific product.
**`hasActiveSubscriptionFor(productId: String)`**\
Checks if the user has an active subscription for a specific product.
**`hasActiveSubscriptionFor(subscriptionGroupID: String)`**\
Checks if the user has an active subscription in a specific subscription group.
**`purchasedProductIds()`**\
Retrieves a list of all product IDs the user currently has access to.
**`activeSubscriptions()`**\
Returns detailed information about all active auto-renewing subscriptions.
**`subscriptionStatusFor(productId: String)`**\
Gets detailed subscription status for a specific product, including state information like subscribed, expired, or in grace period.
**`subscriptionStatusFor(subscriptionGroupID: String)`**\
Gets detailed subscription status for a specific subscription group.
Check entitlements before showing paywalls to avoid presenting upgrade prompts to users who already have premium access.
## Fallbacks and Loading Budgets
If a paywall has not completed downloading when you attempt to present it, a loading state can show.
By default, Helium will show this loading state as needed (a shimmer view for up to 2 seconds). You can configure, turn off, or set trigger-specific loading budgets.
If the budget expires before the paywall is ready, a fallback paywall will show if available otherwise the loading state will hide and a [PaywallOpenFailed](/sdk/helium-events) event will be dispatched.
The iOS sdk has 3 options for fallbacks:
1. [Fallback bundles](/guides/fallback-bundle)
2. Default fallback view
3. Fallback view per trigger
All of this is configured via the `HeliumFallbackConfig` object passed in to `initialize`. Here are some examples:
```swift
// Just provde a fallback bundle
let fallbackBundleURL = Bundle.main.url(
forResource: "fallback-bundle-xxxx-xx-xx",
withExtension: "json"
)
let fallbackConfig = HeliumFallbackConfig.withFallbackBundle(fallbackBundleURL)
// Provide fallback view and configure loading budgets
let fallbackConfig = HeliumFallbackConfig(
fallbackView: YourFallbackView(),
// Global loading budget (in seconds)
loadingBudget: 2.0,
// Per-trigger loading budgets
perTriggerLoadingConfig: [
"onboarding": TriggerLoadingConfig(loadingBudget: 4),
"quick_upgrade": TriggerLoadingConfig(useLoadingState: false),
]
)
Helium.shared.initialize(
apiKey: "your-api-key",
fallbackConfig: fallbackConfig
)
```
## Testing
Docs here coming soon! After integration, please message us directly to get set up with a test app + in-app test support.